Saturday, June 14, 2014

Fancy That Romper

I have been looking to make a romper that is suitable for my curves. These are some images of suitable rompers with an elegant twist. This is exactly what I need to add to my summer wardrobe. Check this out: A white deep v-neckline plunge with side cutouts and sleeves that move with the wind.


Then we have Eva Longoria sporting an emarald green long sleeved crossover top jumpsuit with fitted shorts. I love how she is rocking this look with neutral colored strappy heels.


Finally, this black and white halter-style romper with unique racer back straps. It has a hidden zipper on center back and elasticized waistline.
                                

Overall, I would like to sew a romper that can double for casual or out for the night. These are some patterns that I have to help me achieve my fancy romper:

                        Vogue 1308                                         McCall's 6969                                
              V1308      M6969                            
                                                           Simplicity 1373
                                                  

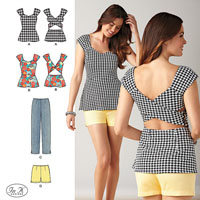
Yes, the simplicity pattern 1373 can be customized as a romper by doing some radical moves to the top. First, use the back as the front (both views) and re-draft the back to scoop just below the shoulder blades and close the open back. At the waistline, remove the fabric as directed and add 1.5 inches. Lastly, add the shorts (view D) to the top. Based on my brainstorming, I should have something that looks like this:
                                       
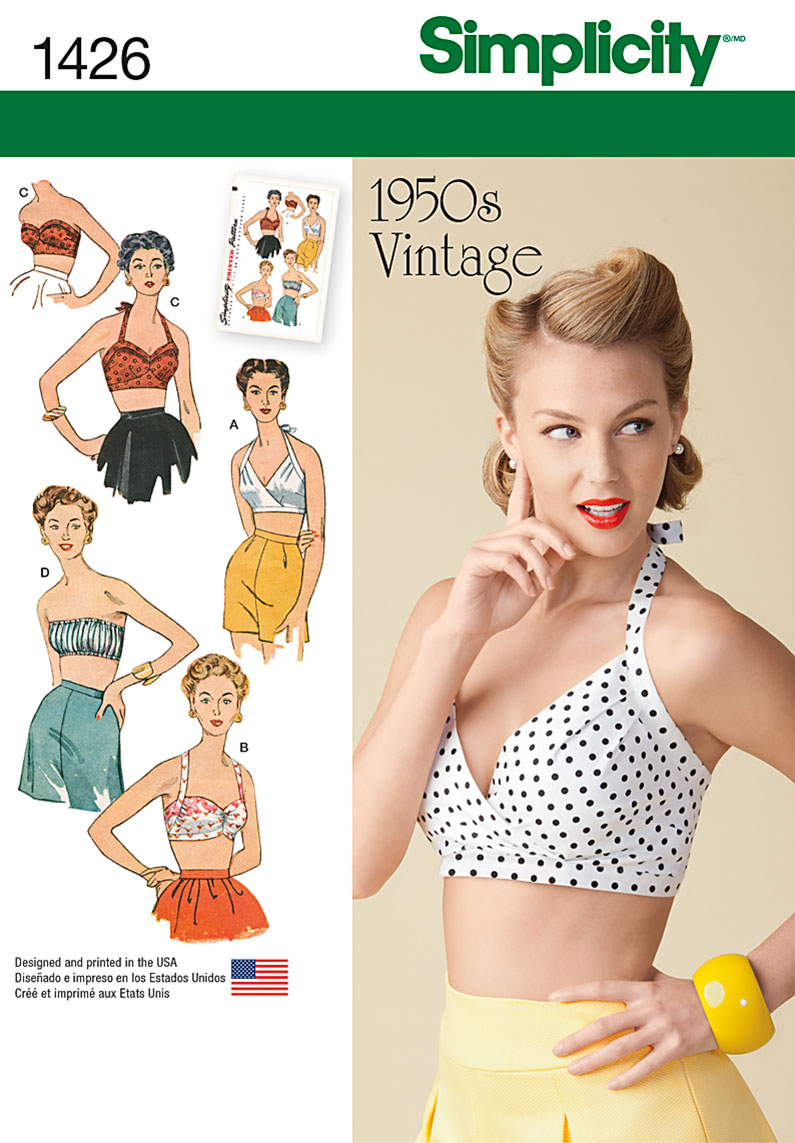
Or, I can go vintage with this recent purchase:
                                               

Either way, I need to add a romper/playsuit to my closet to beat the heat in style.

See you later!!

Tuesday, April 15, 2014

Ala Bargainista Fashionista: A Monokini Desire (Test Run)

There is a contest over at sewingpatternreview called Bargainista Fashionista and I'm in it.
I found this amazing monokini from Michael Kors with a retail price of $200.00. Take a look at my inspiration for my project:      


In order to achieve this look, I purchased Kwik Sew 3608 as pictured here:

K3608

I am a bit intimidated by the idea of flaunting so much skin. However, after I made my own modifications to Kwik Sew 3608, I felt comfortable, confident and sassy. I have never owned this particular type of bathing suit, but it deceivingly worked for my curves.


This is my work in progress (WIP). There were several changes that I had to execute to achieve my monokini desire. First, I traced the pattern on tracing paper. Then, I redrafted a more modest side opening to mirror the Michael Kors Monokini. Also, I dropped the leg opening by grading to the next size. Additionally, I increased the side seams on the back. 
This is my wearable muslin. Right now, it has no elastic, nor lining. Still to come...trying to figure out how to recreate the same top back piece as my inspiration piece.  

Night. Night.

Sunday, April 13, 2014

Simplicity: A Vintage Bra from the 50's


Every time my local, big chain fabric store had a sale on Simplicity patterns, I would check for their new vintage pattern from the 1950's, but I could never find it in my size. So for the first time, in a long time, I bought the pattern at full price: $10.75 with a coupon from retailmenot.com.
 

I traced the pattern on tracing paper and added an extra 3/8" to give me a total one inch seam allowance.


I did my best to  follow every step to the tee. On steps 1 through 4, I felt like I was on a roll. However, step 5 (smh) slowed my sewing flow. It reads, "Understitch  by pressing seam toward lining and stitching through seam allowances close to seam."  I had to do a quick youtube search on understitching, Once I figured out the correct seams to understitch, things were running smooth. I had to spend some time with my seam ripper because I made a blooper. I understitched correctly, but on the wrong seams...lol. My seam ripper rocks!!

The flowers on my fabric are very busy, so I used a solid color to balance everything out. I am glee happy to have almost finished this bra top. Here it is:


I just need to complete step 16, which means I have to add the buttons. Right now, a safety pin is completing the ensemble. See it:


This was my practice run for this pattern. I made some mistakes and learned from them. I plan on making version B and C on a later date. I am loving this vintage bra top.

Hasta Luego!!

Monday, March 31, 2014

Quick Recon Idea for an Oversized Tee

I desperately needed a  work out top, so I reached for one of my over-sized t-shirts. As seen here:
So, I grabbed my scissors and started figuring out how to expose my shoulders, but keep the under arm covered. At the same time, I re-did the seam line from the sleeve to the side seam to get a more fitted look. This is the result:
 I was pleased with the result. While at the gym, I noticed that the sleeve part kept sliding down. So, I'm planning to adjust the ease of the sleeve. Other than that, this t-shirt held up pretty good as I ran two miles and worked out with weights.

Laters.

Friday, February 21, 2014

Exploring A Burdastyle Magazine

I bought the Burdastyle Magazine for Spring/Summer 2013 (Plus) a while back. It was the first time I invested in Burdastyle because I usually avoid them. Why? Well, if you must know, the sizing is very typical for gals that are on the slender, more proportioned side. My curves are full, ample and beyond their average sizing.
Did I mention this is a magazine for plus size? Honestly, I had to get over the whole word itself "PLUS"...ugh. I mean do we really need to announce it, and give it its own category. Then, the models they have don't really fill up the clothes because the models are too skinny for the fashion pieces. Once again, I just had to settle, accept, and move on.

Let me show you the goodies inside:


I am very excited about these looks. Since it will be my first time exploring a burdastyle magazine, I will be using the internet for hints on how to lift the pattern on to paper. I plan on chosing a design that has the least amount of pieces, just to get the hang of it.

Wish me luck!!


Sunday, February 16, 2014

Can You See Me, Army Hoodie?

Hip, hip, hooray, I have made my first hoodie! This is great because I like to wear hoodies for work and the gym constantly. The pattern I used was vogue 8951. As seen here:
 
It is described as a close-fitting tunic for moderate stretch knits. I bought this army knit fabric a couple of months ago, not really knowing how I was going to use it. Here's a picture with an actual model from vogue:


I am so happy with the results. This is my wearable muslin, as I plan to take this pattern through some ambitious "re-visioning". I plan to incorporate some changes to the hem to make this a tunic with a curved hemline, so as to look something like this:


Another inspiring change would be to make a sleeveless version inspired by zumba attire. Check this out:


There are just so many ways that this basic, very easy pattern can enhance your work out gear. This is another idea of what I want to do with this pattern. I would like to remove the v-neck and make a crew cut neckline with a raised sideways hoodie like this one:


So enough of my pending ventures with this pattern. Let's just get to the final product. Here it is:

Displaying 20140216_214916.jpg   Displaying 20140216_214933.jpg  Displaying 20140216_214925.jpg
There were some changes I had to make: added length to sleeves, removed excess ease from waistline, and skipped out on the interfacing. It is categorized as "very easy" and it is just that. This pattern will definitely "jazz up" my work out gear.

Good night.


Sunday, January 26, 2014

It's been a long time since I've posted anything, so here is my first entry for the new year...go 2014!!

It is the end of January and I have been going to aqua aerobics classes. We have been having lots of sun which made it appropriate for me to make a bathing suit. I purchased a vintage swimsuit pattern from Etsy many months ago. Check it:
  
I chose to do the one piece (swimsuit B) with donated swimwear fabric. It was simple to put the bathing suit together. The instructions were clear. I did do something different. I added elastic along the center back seam to get the desired WOW factor on the "booty". I am loving my one piece!! Here are the results:

Swimsuit B Front

Swimsuit B- Back

It took about four days (spaced out in a two week period) to finish this beauty. I enjoyed working with this vintage pattern. Next time, I want to make something that looks like this: 
I like the triangle opening near bust area. I think I have the right pattern to do this alterations. Wish me luck!!
Laters.